


J.P. Carpet and Tile Care is thrilled to be teaming up with one of our very favorite bloggers of all time... Jen from Tatertots and Jello! Welcome TT and J readers! If you're NOT familiar with Jen or her blog, then you are seriously missing out! I met Jen a couple of years back when I first started my family blog. She quickly became one of my favorite people.
TT and J is full of fabulous DIY project ideas, recipes, crafts, and all other sorts of fabulousness for your home. Something else that goes on over there? GIVEAWAYS!! And that's what we've teamed up for today!
Jeremy recently did some carpet and tile cleaning for Jen, and now together we'd like to offer a chance for YOU to have carpet or tile cleaning done absolutely FREE! If you're here from TT and J, well you know what to do! If you'd like to see what Jen thought of our work, and find out how you can enter to win FREE carpet or tile cleaning, just click here!
Good luck! I hope you win!
Saturday, August 20, 2011
Monday, August 1, 2011
Thrifty Decorating - $200 wall art for under $20!
Around here, one of my favorite hobbies is finding ways to enhance my home for less. That's what I love about the blogging world, there are so many great ideas right at your fingertips!
I first saw this idea over at one of my very favorite decorating blogs, Thrifty Decor Chick. The project is inspired by this set of Ballard Designs wall plaques:

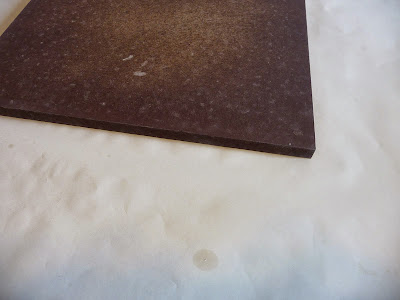
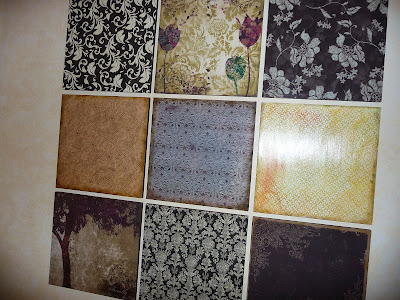
1. Start out with 1/2 inch medium density fiber board (MDF), cut into 12"x12" squares. Home Depot cut it for me. I used 9 squares.

2. Spray paint the edges of your MDF board. I used Rustoleum Espresso Brown.
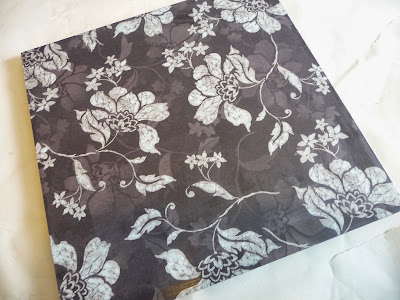
3. Select a variety of scrapbook papers and adhere to your squares with Mod Podge. I have generally been able to be relatively wrinkle free with my projects, but this large surface proved to be a challenge...the first few squares I did looked terrible! But I snooped around and snagged some tips from other bloggers, and I had much better luck this time! Put MP on the back of the paper and on your hard surface, then use a straight edge (like an old credit card - thanks for the tip Jen) to smooth out all the bubbles. Let dry before adding MP over the top of the paper.
4. Let boards dry completely.
5. Once dry, flip your boards over and use an X-acto knife to trim any paper edges that are overlapping.

6. Hang on your wall and enjoy the compliments! Mine are nailed right into the wall so they are flush with the wall and perfectly even.

I spent $16 for the MDF board, and I already had the spray paint and scrapbook paper. And I always, ALWAYS have Mod Podge on hand. However I recently ran across a recipe for homemade Mod Podge that I want to try - because you know I'm all about the thrifty!
Do you have any great thrifty decorating tips to share?
I'm excited to announce that this month someone will win a FREE whole-house carpet cleaning! Keep watching for the official announcement with all the details - make sure to follow us on Facebook to receive all the updates!
I first saw this idea over at one of my very favorite decorating blogs, Thrifty Decor Chick. The project is inspired by this set of Ballard Designs wall plaques:

Isn't it pretty? For a mere $200.00 you can have it!
OR
You can create your own version for a fraction of the price!
Sara over at Thrifty Decor Chick used scrapbook paper and spray adhesive, however my very favorite medium for creating inexpensive decor for my home is Mod Podge, so I used it instead of spray adhesive - here's how I did it:
1. Start out with 1/2 inch medium density fiber board (MDF), cut into 12"x12" squares. Home Depot cut it for me. I used 9 squares.

2. Spray paint the edges of your MDF board. I used Rustoleum Espresso Brown.

3. Select a variety of scrapbook papers and adhere to your squares with Mod Podge. I have generally been able to be relatively wrinkle free with my projects, but this large surface proved to be a challenge...the first few squares I did looked terrible! But I snooped around and snagged some tips from other bloggers, and I had much better luck this time! Put MP on the back of the paper and on your hard surface, then use a straight edge (like an old credit card - thanks for the tip Jen) to smooth out all the bubbles. Let dry before adding MP over the top of the paper.

4. Let boards dry completely.

6. Hang on your wall and enjoy the compliments! Mine are nailed right into the wall so they are flush with the wall and perfectly even.
I get more compliments on this wall art than any other thing in my home.


I spent $16 for the MDF board, and I already had the spray paint and scrapbook paper. And I always, ALWAYS have Mod Podge on hand. However I recently ran across a recipe for homemade Mod Podge that I want to try - because you know I'm all about the thrifty!
Do you have any great thrifty decorating tips to share?
I'm excited to announce that this month someone will win a FREE whole-house carpet cleaning! Keep watching for the official announcement with all the details - make sure to follow us on Facebook to receive all the updates!
Monday, July 18, 2011
FREE Stuff Rules!!
We are thrilled to be offering FREE stuff to our potential customers - just for giving us a chance to come evaluate your carpet/upholstery/tile cleaning needs!
Everyone who schedules a free, no-obligation consultation will receive a FREE bottle of Home Pro Spotter professional strength spot remover.
 Your consultation is completely free, and there is absolutely no obligation to use our services. I will come to your home and give you my honest, professional recommendation on what is best for meeting the cleaning needs of your family, as well as answer any questions you may have. I will give you an upfront price quote, so you know exactly what you will pay should you choose to use our services. The Home Pro Spotter is yours to keep whether you decide to hire us or not.
If you decide to join others who have become happy, satisfied customers of J.P. Carpet and Tile Care, you will receive FREE refills on your Home Pro Spotter for LIFE! Simply let us know when your bottle is empty, and we will replace it with a new one!
Doesn't FREE stuff rule??
Everyone who schedules a free, no-obligation consultation will receive a FREE bottle of Home Pro Spotter professional strength spot remover.

If you decide to join others who have become happy, satisfied customers of J.P. Carpet and Tile Care, you will receive FREE refills on your Home Pro Spotter for LIFE! Simply let us know when your bottle is empty, and we will replace it with a new one!
Doesn't FREE stuff rule??
Monday, July 11, 2011
A penny saved....
isn't always necessarily the best policy. Now don't get me wrong, we are all about being frugal in this family. My wife takes great pride in finding creative new ways to save money. She recently posted about a dollar store solution for a household project she was working on, and I'm sure it won't be the last time she posts about her adventures in frugality. But sometimes the old adage "you get what you pay for" really holds true.
If your family is anything like ours, you find yourself saving money by buying store-brand products, looking for deals on ksl.com or craigslist, and scanning the weekly ads to find the best sales. But for certain things, you just feel that you must spend the extra money to get the quality you need in a product or service.
I am always keeping a close eye on the prices and services of others in the carpet cleaning industry. Many are comparable with my own. There are also those who are priced much higher than myself, and then those who are priced lower than me. A few who are significantly lower.
Now the higher priced companies I know offer good, high-end service. To high-end customers. Meaning they price their services at top-dollar, and only market to wealthy people who are willing to pay top dollar. And we all know someone who actually takes pride in the fact that they pay excessive amounts of money for the things they purchase.
On the other end of the spectrum, when I would see flyers for companies with extremely low prices, I just couldn't understand how they were making a living with those prices. I felt that I had evaluated my service, and the cost of running my business, and priced my services accordingly. I didn't want to rip people off, and I certainly didn't want only the rich people to be able to afford my services, but I needed to cover the expense of running my business, plus be able to make a profit, and support my family.
As I became more familiar with my industry, with different companies, with my customers, and asked questions of people who I consider "experts" in my field, - people who have been doing this much, much longer than my 11 years - I learned a few things.
I too could cut my prices and still make a living. The way I could accomplish this would be to sacrifice the quality of the service I provide. I could lower MY expenses by lowering my quality, and the savings could be reflected in my prices.
When Xazmin and I first decided to "hang out our shingle" so to speak, we talked about what it was we wanted to be known for. Would it be our rock-bottom prices? Would it be being available 24 hours a day? Would it be quality? We knew we couldn't be all things to all people. And we both, without hesitation, knew we wanted to be known for our excellent quality. It's how we were raised ("If you can't do something right, don't do it at all!"). That is what we keep in mind with every business decision we make.
When we made our most significant purchase, our truck-mounted hot water extraction machine, I spent countless hours researching and demo-ing different machines. We chose to pay more money for a machine with the latest technology, highest temperatures, and strongest suction, because we knew that it would offer the highest quality cleaning to our customers. We chose to invest more, so that we would be able to offer more.
The same goes for the cleaning solutions we use. There are many, many various options available. I have learned what products work best for different types of floor coverings, as well as different types of soiling and staining. I don't have a one-size fits all method. I invest in a variety of products, so I am able to select and use the best product for any situation. Higher quality products cost me more to keep in stock.
Last, I am continually educating myself on the always-evolving carpet cleaning industry. And I don't mean that I subscribe to cleaning industry magazines and read them cover to cover each time they arrive in my mailbox (although I DO). I mean that I pay money for continual training. I enroll in the Institute of Inspection Cleaning and Restoration Certification (the highest standard in our industry) course every 2-3 years. It is never exactly the same. Yes they cover much that I have already learned, but there is always something new I am able to take away and implement in my service in order to improve. I also take smaller, specialized classes in between. I want to be the most knowledgeable, and most skilled that I can be in my profession.
Investing in high-end cleaning equipment and tools, quality cleaning agents, and continually educating myself on the latest advancements in the industry are expenses that I feel are worth it in order to make sure I provide the highest quality service available. I can't imagine cutting any of these expenses in order to lower my prices.
So yes, there is a corner of the market that I will always lose to my lower-priced competitors. Those who are looking to pay bottom dollar for everything. But the truth is, I actually win over some of those customers when they realize that there is a price to pay for bottom dollar service as well. Several times I have been called in to "fix" the carpet cleaning service provided by another company that has left the customer unhappy. Inevitably they tell their friend or their family member about their bad experience, and our name is given to them (fun fact: so far our business has been 100% referral-based, by happy customers), and we come in and take care of it. A few times they have told me the name of a particular company they were unhappy with, which happens to be one of those "bottom-priced" services that I see advertised frequently. It gives me great satisfaction to know that although I may not always offer the lowest price out there, I definitely offer the highest quality service and the greatest value.
My customers "get what they pay for", and that is what I want to be known for.
Thursday, July 7, 2011
My Dollar Store Solution For Removing Wallpaper From Drywall
The Prows House is seriously ALWAYS a work in progress. We wouldn't trade where we live for the world - we have the best neighbors and friends - but sometimes it would be nice to trade up to a house that was fixed up just the way we would like it. Although is that ever truly accomplished by anyone?
Anyway.... I'm always driving Jeremy crazy with one project or another. Our main bathroom is in pretty poor shape right now. When we bought the house, the bathroom had wallpaper on the walls. In case you ever wonder, wallpaper and moisture are not a great combination. We're big fans of hot showers in this family, and we must be much steamier than the previous owners, because it didn't take long after we moved in for that wallpaper to start rippling, and peeling at the seems. I decided the wallpaper needed to go.
Now I'm no expert at removing wallpaper, but I had researched a few tricks online and got to work. I soon ran into quite the dilemma. Once the top layer, the "vinyl-like" part of the wallpaper was peeled off, the paper/glued down part was a nightmare to try to remove. It should have come off so easily after the soaking I gave it. I quickly realized the problem. The wallpaper was applied directly to the drywall! There was no smooth layer of paint, or even primer to make the soaked pieces of paper and glue easier to remove.
I tried to research solutions to my problem online. But mostly I found posts that said it couldn't really be done, or questionable companies trying to sell expensive wallpaper removal kits. I wasn't about to take a chance on shelling out my money for a product that may not work.
I was so embarrassed whenever company came over and wanted to use the bathroom. Partially stripped walls with splotches of adhesive everywhere looks way worse than rippled, peeling at the edges wallpaper. It was bad. I finally couldn't take it anymore and decided that I needed to experiment, to try something. After all, it couldn't get any worse, right?
I had read that fabric softener works well to remove wallpaper. But I knew I had to be careful scraping off the wallpaper, if I didn't want to make gouges in the drywall. I headed to the dollar store, picked up a spray bottle, and a cheap jug of fabric softener.


I was still not sure what I would use as a scraper. The paint scraper at the dollar store was quite sharp, and was sure to do some serious damage to the drywall. Then I ran across this 2-pack of sanding blocks. It was worth a try, right?

It worked like a charm! I filled my spray bottle with fabric softener, sprayed a generous amount onto a section of the wall, and let it sit for just a minute. I didn't want it to be too saturated, as I wanted to make sure the drywall didn't get ruined. I then peeled what I could, and used the sanding block to sort of "file" away the excess paper and adhesive. I immediately wiped the excess moisture from the wall with a dry rag.
I'm so glad I didn't waste my money on one of the expensive products online, that may or may not have worked! I spent under $5: 1 spray bottle, one jug of fabric softener, and 2 sanding block packs. I can tell that I will have to purchase more of the sanding blocks before the project is finished - but I will still be into it less than $10.
I'll keep you posted on how the bathroom makeover works out! Do you have any great DIY tricks or tips you'd like to share? I love all the help I can get in the ongoing adventure that is my "homemaking".
Wednesday, July 6, 2011
Making my Mark
I recently had a little bit of fun while cleaning the carpets of a rental property owned by a family friend. It is truly remarkable the difference good equipment and quality technique can make in the appearance of your carpet.


If you have any questions you'd like answered, shoot me an email, leave a comment, or connect with us on Facebook.


If you have any questions you'd like answered, shoot me an email, leave a comment, or connect with us on Facebook.
Tuesday, July 5, 2011
The Dryness Factor
One of the most talked about issues in the carpet cleaning industry, particularly in the advertising of services, is drying time. Many companies tout quickest drying times as the sole reason to choose their services above the rest.
Although alternative methods of carpet cleaning (i.e. carbonated chemical cleaning, and bonnet cleaning) can have shorter drying times, there are pros and cons (to be discussed in a future post) to all of the different methods of carpet cleaning. Drying time, although important, should not be the only consideration when choosing a cleaning company.
Let's learn a little bit more about the "dryness factor", as it pertains to the hot water extraction method.
The truth is, many variables contribute to the length of time carpets will take to dry.
Dry times vary depending upon the temperature inside the home, as well as the weather outside the home. For example, rainy or humid weather can cause carpets to dry more slowly. Whereas, in dry, warm weather, opening windows can increase the speed of drying. Turning the furnace up during the winter can also speed up the drying process.
Another factor that affects drying time is how much water it actually takes the technician to clean a particular area. For instance, the area in front of the couch may take more effort (thus more water) to clean, and will usually take more time to dry.
The quality of equipment used can also play a large role in carpet drying times. Higher powered machines, with stronger suction will pull more of the water out, thus leaving less moisture that needs to dry by evaporation. However, even smaller companies with less powerful equipment can impact their drying times greatly, simply by the effort they are willing to put into the process. The more "dry strokes", or passes of the carpet cleaning wand where water is being extracted rather than injected, that a technician performs - the shorter the drying time will be. A good technician will perform dry strokes until he is satisfied that there is no more moisture that can possibly be extracted by suction.
At J.P. Carpet and Tile Care, not only is our equipment top of the line with high-powered extraction, but our service is also top of the line. We take extra care and time to make sure carpets are left as dry as possible by our process, insuring the quickest drying times along with the highest quality cleaning. Most areas will dry in 2-4 hours, however, many areas are dry before we ever leave your home.
I hope this insight into the "dryness factor" was helpful, and I welcome any feedback, or questions you may have. We're gearing up for a fantastic promotion and giveaway, so make sure to check back!
Follow us on Facebook to receive the latest updates.
Subscribe to:
Posts (Atom)
